
Edit: As of this posting, it is uncertain as to the future of the Twitter API.
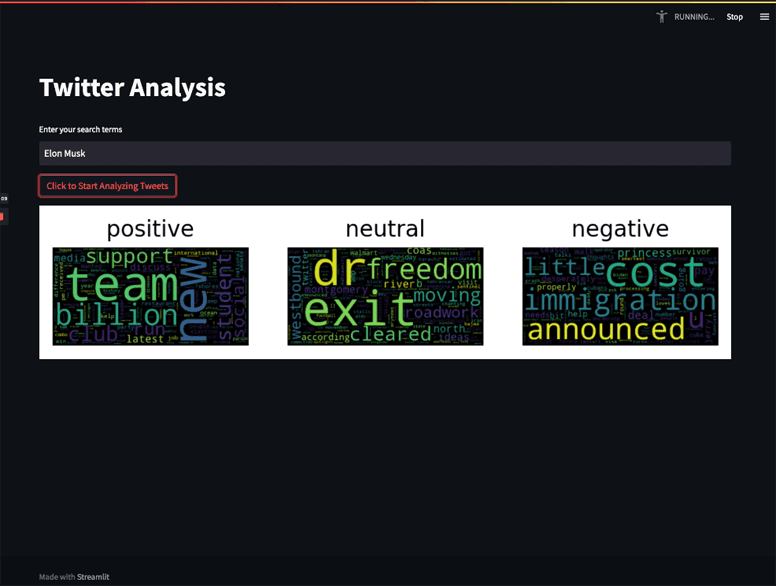
A couple of months ago we released a blog post that walked through how you can consume a stream of data from the Twitter API to analyze tweets on a certain subject. The output, when running, was a list of the most commonly occurring words for each sentiment category (positive, negative, neutral). Today, we are going to build on and improve that application. First, we will integrate Streamlit to make our application interactive, second, we will update the sentiment analysis step to use a fine-tuned model for twitter analysis from Cardiff University, and then lastly, we will use matplotlib to visualize the words associated with the sentiment in a word cloud. This turns our dataflow into an interactive streaming data application that a user can use to explore sentiment associated with search terms in real-time. The final application will look like the image below.
If you want to skip the tutorial and go straight to running the app. Clone the repo, build the docker image and run the container following the instructions in the #Running the Application section. Now you can start examining different search terms.

To get started we are going to borrow some of our previous work that will help us connect to the Twitter API. You can reference the way we did this in the previous blog post. This will lead you through the steps of setting up a Twitter developer account, getting an API key and setting it as an environment variable.
Building the Streamlit App
We are going to break down the dataflow.py file in the rest of this tutorial and how we use Streamlit to bring it to life!
Our Streamlit app is powered by Bytewax. Bytewax is a Python framework for processing streaming data. It allows you to transform your data by chaining operators together in what is called a dataflow. Bytewax has both stateful and stateless operators that allow you to do many things from filtering to aggregating over a window of time. The dataflow we are going to develop will have 5 main parts:
- Input - Getting search terms from the dashboard and then data from Twitter
- Data Prep - Cleaning
- Sentiment Analysis - Scoring the sentiment of the tweet
- Data Aggregation - Grouping by sentiment over time and sorting
- Output - Creating a wordcloud in our Streamlit frontend.
Input
Input in the case of our application is first the search terms passed in via our user that we will then in turn set as rules using the Twitter API. Secondly, it is the stream of tweets that we will consume in our dataflow.
First, let’s set up our application to use Streamlit and provide a text box to get the search terms.
import streamlit as st
from bytewax.dataflow import Dataflow
from bytewax.inputs import ManualInputConfig
from bytewax.execution import run_main

from twitter import get_rules, delete_all_rules, get_stream, set_stream_rules

# set up page details
st.set_page_config(
    page_title="Live Twitter Sentiment Analysis",
    page_icon="🐝",
    layout="wide",
)

def input_builder(worker_index, worker_count, resume_state):
    return get_stream()

# ...
# Transformation functions omitted here
# ...

if __name__ == "__main__":
        st.title("Twitter Analysis")

    flow = Dataflow()
    flow.input("input", ManualInputConfig(input_builder))
        # ...
        # Full dataflow construction omitted for brevity
        # ...

        search_terms = [st.text_input('Enter your search terms')]
    print(search_terms)

        if st.button("Click to Start Analyzing Tweets"):
        rules = get_rules()
        delete = delete_all_rules(rules)
        set_stream_rules(search_terms)

                #run the dataflow
        run_main(flow)
The code above is based off of boilerplate Streamlit code and some Twitter API magic added in. We provide an st.text_input field for search terms and then provide an st.button to kick off the dataflow. The functions used when the Streamlit button is clicked get_rules, delete_all_rules and set_stream_rules are implemented in twitter.py and were copied directly from the Twitter developer docs Python example. The function get_stream was modified to be a generator so that it can be used with Bytewax as an input. Finally the run_main(flow) call is the Bytewax execution method that will run this dataflow in process.
Data Prep
If you recall the previous iteration removed the emojis, but the update to using the tweet-tuned transformer model allows us to keep them around and simplifies our code. We still need to do some cleaning to get our text in a more usable format 😛. The code shown below will remove characters that won’t be handled in the model for sentiment analysis and expand contractions for ease of understanding.
 import re
from contractions import contractions

# load contractions and compile regex
pattern = re.compile(r'\b(?:{0})\b'.format('|'.join(contractions.keys())))

def remove_username(tweet):
    """
    Remove all the @usernames in a tweet
    :param tweet:
    :return: tweet without @username
    """
    return re.sub('@[\w]+', '', tweet)

def clean_tweet(tweet):
    """
    Removes spaces and special characters to a tweet
    :param tweet:
    :return: clean tweet
    """
    tweet = tweet.lower()
    tweet = re.sub(pattern, lambda g: contractions[g.group(0)], tweet)
    return ' '.join(re.sub("(@[A-Za-z0-9]+)|([^0-9A-Za-z \t])|(\w+:\/\/\S+)", " ", tweet).split())

# ...

# if __name__ == "__main__":

        # ...
        # flow = Dataflow()
        # flow.input...
    flow.map(remove_username)
    flow.map(clean_tweet)
Sentiment Analysis
As mentioned, the original post used a generic sentiment analysis model from a Python library called TextBlob. As was noted in the post, it really didn’t perform all that well on inspection. So to update our code, we are leaning on the amazing work of the Cardiff NLP team. The model used can be be found on Hugging Face and is described as “ a RoBERTa-base model trained on ~124M tweets from January 2018 to December 2021, and finetuned for sentiment analysis with the TweetEval benchmark.”
The way that Bytewax works, each worker will load the model and make predictions. In this case, our input and output are constrained to single input and output interface, but we may want to increase the parallelization to cope with the compute demands of the sentiment analysis.
from transformers import AutoTokenizer, AutoModelForSequenceClassification, AutoConfig
import numpy as np
from scipy.special import softmax

# load sentiment analysis model
MODEL = "model/"
tokenizer = AutoTokenizer.from_pretrained(MODEL)
model = AutoModelForSequenceClassification.from_pretrained(MODEL)
config = AutoConfig.from_pretrained(MODEL)

def get_tweet_sentiment(tweet):
    """
    Determines the sentiment of a tweet whether positive, negative or neutral
    :param tweet:
    :return: sentiment and the tweet
    """
    encoded_input = tokenizer(tweet, return_tensors='pt')
    output = model(**encoded_input)
    scores = output[0][0].detach().numpy()
    scores = softmax(scores)
    ranked = np.argsort(scores)
    ranked = ranked[::-1]
    sentiment_class = config.id2label[ranked[0]]
    sentiment_score = scores[ranked[0]]

    return sentiment_class, tweet

# ...

# if __name__ == "__main__":

        # ...
        # flow = Dataflow()
        # flow.input...
        # ...
        # flow.map(clean_tweet)
    flow.map(get_tweet_sentiment)
That’s it! Seems pretty easy right 🙂. At this step in our dataflow, we will have data in the shape of (sentiment, tweet) and we are going to use that in the following steps to aggregate the words used for each sentiment category over time.
Data Aggregation
Word clouds are a representation of the occurrence of words in a body of text, or in our case a series of tweets. The most commonly occurring words will show up in larger font. It is an easy way to visually represent what is going on in this case since we can quickly see the trending words (most commonly occurring) based on our search and over a period of time. In this case, we want to show them by sentiment classification. The code below will split up the tweets into words, remove stop words or words that don’t carry meaning, and then count the occurrences over time (window step). Finally, we will sort the words by occurrence and then join the sentiments together so our data will be in the format: ("all", dictionary of words by sentiment).
import spacy
from bytewax.window import TumblingWindowConfig, SystemClockConfig

# load spacy stop words
en = spacy.load('en_core_web_sm')
en.Defaults.stop_words |= {"s","t",}
sw_spacy = en.Defaults.stop_words

# window size in minutes
WINDOW_SIZE = 1

# ...

def split_text(sentiment__text):
    key, text = sentiment__text
    tokens = re.findall(r'[^\s!,.?":;0-9]+', text)
    data = [(key, word) for word in tokens if word not in sw_spacy]
    return data

# Add a fold window to capture the count of words
# grouped by positive, negative and neutral sentiment
cc = SystemClockConfig()
wc = TumblingWindowConfig(length=timedelta(minutes=1))

def count_words():
    return defaultdict(lambda:0)

def count(results, word):
    results[word] += 1
    return results

def sort_dict(key__data):
    key, data = key__data
    return ("all", {key: sorted(data.items(), key=lambda k_v: k_v[1], reverse=True)})

def join(all_words, words):
    all_words = dict(all_words, **words)
    return all_words

# ...

# if __name__ == "__main__":

        # ...
        # flow = Dataflow()
        # flow.input...
        # ...
        # flow.map(get_tweet_sentiment)
        flow.flat_map(split_text)
    flow.fold_window(
        "count_words",
        cc,
        wc,
        builder = count_words,
        folder = count)
    flow.map(sort_dict)
    flow.reduce("join", join, join_complete)
Flat Map
There is quite a lot going on in this part of the dataflow with some operators you might not have seen before. Let’s walk through them one by one.
def split_text(sentiment__text):
    sentiment, text = sentiment__text
    tokens = re.findall(r'[^\s!,.?":;0-9]+', text)
    data = [(sentiment, word) for word in tokens if word not in sw_spacy]
    return data

# flow.flat_map(split_text)
First up we are using the flat_map operator. We pass a function called split_text to the operator. In the function, we are using regex to tokenize our line of text into separate tokens (basically words), and then we are removing any of the stop words. At this point, we now have a list of tuples of the format (sentiment, word). The flat map operator changes the flow of data in some respect in that it takes a list and passes along each item in the list individually. So the output of this step in the data flow is the (sentiment, word) tuples.
Fold Window
The next step in our dataflow is an aggregation step where we will count the occurrence of words over time. Here we leverage the fold window operator, which allows us to aggregate items in an object by key and over a duration of time.
cc = SystemClockConfig()
wc = TumblingWindowConfig(length=timedelta(minutes=1))

def count_words():
    return defaultdict(lambda:0)

def count(results, word):
    results[word] += 1
    return results

# flow.fold_window(
#     "count_words",
#     cc,
#     wc,
#     builder = count_words,
#     folder = count)
Reduce
Now that the text has been classified and we have grouped the non-stop words by sentiment and counted their occurrences, we want to join all of them together so that we can plot them all at the same time. The code below will re-key the words and then join them all. In this scenario, we are assuming there will be tweets fitting into positive, neutral and negative sentiment classifications, which may not necessarily be the case if there are not a lot of tweets during the specified time frame. If that is the scenario, it will carry over the reduce until there are at least 3 available.
def join(all_words, words):
    all_words = dict(all_words, **words)
    return all_words

def join_complete(all_words):
    return len(all_words) >= 3

# flow.reduce("join", join, join_complete)
Output
Now to interact with the Streamlit dashboard. To designate output in Bytewax, we use the capture operator. This has a number of pre-built connectors, but we can always add a custom one with any of the available Python libraries. In this application, we are using a custom output method, so we use the ManualOutputConfig which we can pass in our builder function.
from bytewax.outputs import ManualOutputConfig

def output_builder2(worker_index, worker_count):
    placeholder = st.empty()
    def write_to_dashboard(key__data):
        key, data = key__data
        with placeholder.container():
            fig, axes = plt.subplots(1, 3)
            i = 0
            for sentiment, words in data.items():
                # Create and generate a word cloud image:
                wc = WordCloud().generate(" ".join([" ".join([x[0],]*x[1]) for x in words]))

                # Display the generated image:
                axes[i].imshow(wc)
                axes[i].set_title(sentiment)
                axes[i].axis("off")
                axes[i].set_facecolor('none')
                i += 1
            st.pyplot(fig)

# ...

# if __name__ == "__main__":

        # ...
        # flow = Dataflow()
        # flow.input...
        # ...
        # flow.reduce("join", join, join_complete)
        flow.capture(ManualOutputConfig(output_builder2))
In our output builder function, we are using the Streamlit empty() container which will allow us to clear and recreate our wordcloud. In the output builder we have a write_to_dashboard function and this will receive each data payload from the reduce step. We use a wordcloud python library to create a wordcloud plot and matplotlib to plot it on our Streamlit dashboard.
Running our Application
To run the application we are using docker to mitigate any issues with dependencies. This also allows us to speed up running the application since we can download the model locally. If you have a slower internet connection, please be aware that you may run into timeouts; the model and some of the libraries are quite large. The Dockerfile below installs the required libraries, corpora and models and assigns the port for our Streamlit application.
FROM python:3.9-slim

EXPOSE 8501

WORKDIR /app

RUN apt-get update && apt-get install -y \
    build-essential \
    software-properties-common \
    curl \
    && rm -rf /var/lib/apt/lists/*

COPY . .

RUN pip3 install --default-timeout=900 transformers[torch]==4.21.2
RUN pip3 install -r requirements.txt

RUN python3 -m spacy download en_core_web_sm

# Load the BERT model from Huggingface and store it in the model directory
RUN mkdir model
RUN curl -L https://huggingface.co/cardiffnlp/twitter-roberta-base-sentiment-latest/resolve/main/pytorch_model.bin -o ./model/pytorch_model.bin
RUN curl https://huggingface.co/cardiffnlp/twitter-roberta-base-sentiment-latest/raw/main/config.json -o ./model/config.json
RUN curl https://huggingface.co/cardiffnlp/twitter-roberta-base-sentiment-latest/raw/main/merges.txt -o ./model/merges.txt
RUN curl https://huggingface.co/cardiffnlp/twitter-roberta-base-sentiment-latest/raw/main/special_tokens_map.json -o ./model/special_tokens_map.json
RUN curl https://huggingface.co/cardiffnlp/twitter-roberta-base-sentiment-latest/raw/main/vocab.json -o ./model/vocab.json

ENTRYPOINT ["streamlit", "run", "dataflow.py", "--server.port=8501", "--server.address=0.0.0.0"]
We can build our Docker image and run it with the commands below. You will need a bearer token to substitute in for <MY-UNIQUE-BEARER-TOKEN>.
docker build -t twitter-streamlit .
docker run --env "TWITTER_BEARER_TOKEN=<MY-UNIQUE-BEARER-TOKEN>" -p 8501:8501 twitter-streamlit
That’s it! Open http://0.0.0.0:8501 and you can enter a search and click on the button to start analyzing tweets in real time.
Thanks for reading!
Give us a star at ‣ and If you have any trouble with the process, or have ideas about how to improve this blog post, come talk to us in the #troubleshooting Slack channel! Bytewax community slack to let us know if you are planning on building something with Bytewax 😊.
Stay updated with our newsletter
Subscribe and never miss another blog post, announcement, or community event.
What is Real-Time ML and Why Does Stream Processing Matter


